The fear of losing a tiny diamond from your pavé ring isn’t just paranoia; it’s a valid concern rooted in metal fatigue, not just bad luck.
- Home inspection is a diagnostic skill focused on spotting metal wear and structural weakness, not just finding an already loose stone.
- Key warning signs include flattened beads, a gritty texture, and any catching on fabric, which signal metal fatigue long before a stone moves.
- Proactive care, including proper cleaning and professional annual checks, is far more effective than reactive repairs.
Recommendation: Adopt a jeweller’s mindset. Learn to inspect for the *causes* of stone loss (worn metal) using a loupe and specific tactile tests, making preventative maintenance your primary strategy.
That subtle glint of panic when you glance at your diamond-encrusted ring is a feeling many owners know well. Is every stone still there? The immediate instinct is to run a finger over the surface, hoping everything feels smooth. This anxiety is especially potent with pavé settings, where dozens, sometimes hundreds, of tiny gems create a brilliant surface. Most advice you’ll find online revolves around reactive checks: poking stones with a toothpick or listening for a rattle. But as someone who has spent countless hours at the bench, I can tell you that by the time a stone is rattling, you’ve already missed the most important warning signs.
The common approach treats the symptom, not the cause. The real culprit behind most lost pavé stones is not a single, sudden impact, but the slow, insidious process of metal fatigue. The tiny metal beads or prongs holding each gem are subject to constant, microscopic abrasion from daily life. They wear down, lose their shape, and eventually, their grip. Understanding this process is the first step to shifting from a paranoid owner to an empowered custodian of your jewellery.
But what if the key wasn’t just checking for looseness, but learning to diagnose the structural integrity of the setting itself? This guide is designed to teach you that skill. We’re moving beyond the simple “toothpick test” and into the realm of proactive diagnostics. I will show you how to look at your jewellery with a jeweller’s eye, to spot the subtle signs of wear that predict future problems, and to understand the forces that put your precious stones at risk.
Together, we will explore the mechanics of why pavé settings wear down, how to evaluate a setting’s quality before you even buy it, and the essential tools and techniques for effective at-home inspection. By the end, you will not only know how to check for a loose stone, but you will understand how to prevent one from ever coming loose in the first place.
In this guide, you will learn to think like a jeweller. We will cover the fundamental reasons for metal wear, compare setting securities, and equip you with the knowledge for proactive maintenance. The following sections break down everything you need to know to secure your treasured pieces.
Summary: A Jeweller’s Guide to Inspecting Pave Settings for Loose Stones
- Why Do the Metal Beads in Pave Settings Wear Flat After 5 Years?
- How to Match the Colour of a Lost Diamond in a Vintage Cluster?
- Channel Set or Pave Set: Which is More Secure for Active Hands?
- The Risk of Stretching a Gem-Set Ring and Popping the Stones Out
- How Often Should You Ultrasonic Clean a Gem-Set Ring Without Loosening Stones?
- How to Spot Uneven Beads in a Pave Setting Before Buying?
- Which 3 Tools Should Every Amateur Gem Hunter Carry in Their Pocket?
- Why Does Micro-Pave Jewellery Require More Maintenance Than Solitaires?
Why Do the Metal Beads in Pave Settings Wear Flat After 5 Years?
The beautiful, continuous sparkle of a pavé setting is achieved by setting small stones very close together, held in place by tiny beads of metal. These beads are the unsung heroes of the design, but they are also its primary point of weakness. The reason they wear flat over time is simple: friction. Every time your ring brushes against fabric, skin, or any other surface, a microscopic layer of metal is worn away. Over five years, this slow, cumulative abrasion can transform a rounded, secure bead into a flattened, ineffective disc.
This isn’t a sign of poor quality, but an inherent characteristic of the design, a fact underscored by its sheer popularity. Indeed, industry data shows that 28% of modern engagement rings feature pavé details, a massive increase from the past. The issue is one of physics; the surface area of dozens of tiny beads is far greater than that of four or six prongs on a solitaire, exposing more metal to daily wear and tear. This process is called metal fatigue. As the beads flatten, their ability to securely overlap the girdle (the edge) of the diamond diminishes, increasing the risk of a stone popping out.
Think of it like the tread on a tire. When new, the tread has deep grooves and sharp edges providing excellent grip. Over time, it wears smooth and loses its effectiveness. The same happens to the beads in your pavé setting. Recognizing the early signs of this wear is the most critical skill you can develop for preventative maintenance, long before any stone even begins to feel loose. It’s about spotting the tire going bald, not waiting for the flat.
How to Match the Colour of a Lost Diamond in a Vintage Cluster?
Losing a stone from a modern piece is frustrating, but losing one from a vintage cluster presents a unique and complex challenge: matching the replacement. Vintage diamonds, especially those from the Art Deco, Edwardian, or Victorian eras, were cut by hand and possess a character that is worlds apart from today’s precision-cut stones. They often have different facet patterns, proportions, and, most importantly, a warmer colour palette. Simply dropping a modern, bright-white brilliant cut diamond into an old cluster will make it stick out like a sore thumb, disrupting the harmony of the piece.
The professional approach is a meticulous process of analysis. A jeweller will first examine the remaining stones under magnification to establish a baseline for their specific colour, clarity, and cut style (e.g., Old European, Old Mine, or transitional cut). They are not looking for a “perfect” D-colour flawless diamond, but for a stone that shares the same “personality” as its neighbours. This ensures the replacement creates a seamless surface of light, maintaining the ring’s antique integrity. The goal is for the new stone to blend in, not to stand out.
This image illustrates the subtle but critical differences between older and modern diamond cuts, which heavily influence their appearance under light.
As you can see, the play of light is entirely different. An old mine cut has larger, blockier flashes of fire, while a modern brilliant cut is designed for maximum sparkle and scintillation. For the owner of a vintage piece, this means that if a replacement is needed, seeking a jeweller who specializes in antique jewellery is non-negotiable. They will have access to sources for reclaimed or custom-cut stones that can authentically match the spirit of your cherished heirloom.
Channel Set or Pave Set: Which is More Secure for Active Hands?
This is a critical question for anyone who works with their hands or leads an active lifestyle. While pavé settings offer unparalleled sparkle, their design exposes each individual stone to potential snags and impacts. A channel setting, by contrast, offers a significantly higher level of security. In a channel set, stones are nestled side-by-side within a metal channel, with no prongs or beads exposed on the outer surface. The two walls of the channel protect the girdles of the stones from most direct hits.
For daily wear, especially for those in hands-on professions, the channel setting is unequivocally the more secure choice. This isn’t just theory; it’s a practical reality recognized by jewellery experts. As the team at Tianyu Gems wisely notes:
A pavé halo may look jaw-dropping in the proposal video, but if you’re a nurse, a chef, a teacher, or anyone whose hands are constantly in motion, those tiny pavé stones will be at serious risk within a year or two.
– Tianyu Gems jewelry experts, Complete Guide to Jewelry Settings
However, no setting is completely invulnerable. While a channel setting protects against individual stone loss from snagging, its main risk is a significant dent or blow to one of the channel walls. Such damage can compromise the integrity of the entire channel, potentially loosening multiple stones at once. The pavé setting’s weakness is frequent, small-scale failures, whereas the channel setting’s weakness is rare but potentially larger-scale failure.
The following table breaks down the security characteristics of each setting, helping you make an informed choice based on your lifestyle.
| Setting Type | Security Level | Best For | Main Risk |
|---|---|---|---|
| Pave Setting | Moderate | Office work, special occasions | Individual stone loss from snagging |
| Channel Setting | High | Daily wear, active lifestyles | Multiple stone compromise if wall dents |
| Bar Setting (Hybrid) | High-Moderate | Balance of security and sparkle | Less common, harder to repair |
Ultimately, the choice is a trade-off between maximum brilliance and maximum durability. For anyone with truly active hands, a channel setting offers greater peace of mind and significantly reduces the need for frequent maintenance and repair.
The Risk of Stretching a Gem-Set Ring and Popping the Stones Out
Requesting to have a ring resized seems like a simple procedure, but when it comes to a gem-set band, especially a pavé one, it is one of the riskiest alterations you can request. The primary danger lies in a method called “stretching.” This technique involves forcing the ring onto a tapered steel mandrel to expand its size. While quick and cheap, it’s a brutal process that fundamentally alters the ring’s geometry. As the metal band is forced into a larger circle, its original curvature flattens out. This change in shape is the enemy of your setting.
The seats that hold your stones were cut and shaped to fit the ring’s original, perfect curve. When that curve is distorted, the metal holding the stones is pulled and torqued. The tiny beads or prongs are forced apart, and their grip on the gems is instantly compromised. It is not uncommon for stones to literally “pop out” during the stretching process or become so loose that they are lost within days of the customer getting the ring back. A reputable jeweller will almost never stretch a gem-set ring.
The only safe way to resize a pavé or channel-set ring is to cut the shank and add a new piece of metal, a far more intricate and expensive job. Even then, there are strict limits, especially for full eternity bands where there is no plain metal section to work on. For full pavé eternity rings, resizing is often impossible without completely rebuilding the ring. The risk is directly proportional to how much of the band is covered in stones.
This table outlines the risk associated with resizing different types of rings, providing a clear guide on what is and isn’t safe.
| Ring Design | Stretching Risk | Safe Resizing Method | Maximum Size Change |
|---|---|---|---|
| Full Eternity Pave | Extremely High | Often impossible | None recommended |
| 3/4 Pave | High | Cut and add metal only | 1-2 sizes |
| 1/2 Pave | Moderate | Work on plain shank section | 2-3 sizes |
| Solitaire | Low | Multiple options available | 3-4 sizes |
The lesson here is twofold. First, get your ring size precisely right at the time of purchase. Second, if you must resize a gem-set ring, have an explicit conversation with your jeweller about their method. If they mention “stretching,” walk away. It’s a gamble you don’t want to take.
How Often Should You Ultrasonic Clean a Gem-Set Ring Without Loosening Stones?
The allure of an ultrasonic cleaner is understandable. It promises to restore your ring’s sparkle by vibrating away dirt and grime from every tiny crevice. However, for a pavé-set ring, this tool must be used with extreme caution. The very same high-frequency vibrations that dislodge dirt can also exacerbate a slightly loose stone, shaking it further out of its setting or causing it to fall out completely. A common misconception is that the cleaner *causes* the stone to loosen; in reality, it simply *reveals* a pre-existing problem.
So, how often should you use one? My advice from the bench is conservative: never use an ultrasonic cleaner at home on a pavé ring unless you have just inspected it and are confident all stones are 100% secure. If you hear even the faintest rattle or suspect any movement, the ultrasonic cleaner is the last thing you should use. It’s a finishing tool for secure jewellery, not a diagnostic or repair tool. Many jewellers use them, but only after they have professionally inspected the piece and confirmed its structural integrity.
A much safer home-cleaning method is to use a soft-bristled baby toothbrush, warm water, and a few drops of mild dish soap. This gentle, manual approach removes the buildup of lotions, oils, and dirt that dulls your diamonds without subjecting the setting to potentially damaging vibrations. The key to brilliance is removing the film of grime, which can be done effectively without a machine.
More important than aggressive cleaning is regular professional oversight. To ensure the long-term health of your ring, an annual professional inspection is strongly recommended. A trained jeweller can spot the subtle signs of wear on the beads and prongs—issues invisible to the naked eye—and address them before they escalate into a lost stone. Think of it as an annual check-up for your most precious possessions.
How to Spot Uneven Beads in a Pave Setting Before Buying?
The best way to prevent losing a stone is to start with a high-quality setting. When you’re buying a new piece, you have the power to be a discerning customer. The quality of pavé work can vary dramatically, and learning to spot the difference between excellent and mediocre craftsmanship is your best defense. Uneven, messy, or poorly finished beads are a major red flag, indicating a higher risk of future problems.
As the experts at Ken & Dana Design point out, the quality of the initial work is paramount:
Skilled craftsmen produce better matched melees that line up and secure the stones, reducing the risk of stones coming loose. Poor craftsmanship can result in stones popping out or becoming loose and snagging.
– Ken & Dana Design, Professional Pave Setting Guide
So, how do you inspect this craftsmanship yourself, right there in the store? You don’t need to be a gemologist, but you do need to know what to look for. The goal is to assess uniformity, smoothness, and security. A well-made pavé surface should feel almost like silk to the touch and appear as a uniform river of brilliance under light. Any roughness, snagging, or visual inconsistency should give you pause.
Your Pre-Purchase Pave Quality Checklist
- The Sheen Test: Rotate the ring slowly under a single, direct light source. On a quality piece, a uniform band of sheen will glide smoothly across the entire pavé surface. Gaps or stutters in the sheen suggest unevenly set stones.
- The Stocking Test: Ask the jeweller if you can gently drag a piece of sheer fabric, like a stocking, over the pavé. High-quality work will glide without catching; any snag indicates a raised prong or poorly finished bead that will inevitably catch on clothing.
- 10x Loupe Inspection: Use a jeweller’s loupe (the store will have one) to look at the beads up close. They should be clean, rounded domes, not messy, flattened blobs of metal. All beads should appear consistent in size and shape.
- Examine Bead Finish: While using the loupe, check if the surface of the beads is polished and smooth. Rough, unfinished, or porous-looking metal is a sign of rushed, low-quality work.
- Verify Bead Coverage: Each bead should be perfectly placed to securely overlap the girdles of the adjacent stones it’s meant to hold. There should be no visible gaps between the bead and the edge of the stone.
Performing these checks before you buy empowers you to choose a piece that is not only beautiful but also built to last. It shifts the focus from future worry to present-day quality control.
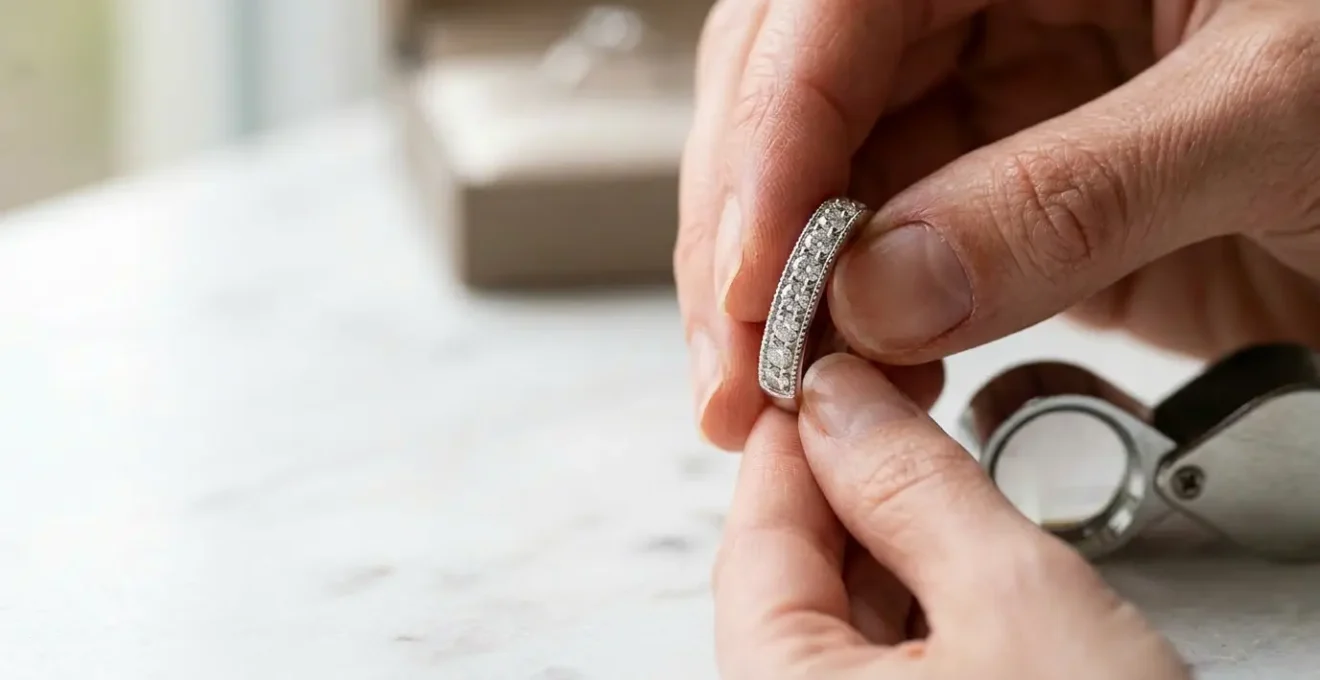
Which 3 Tools Should Every Amateur Gem Hunter Carry in Their Pocket?
To properly inspect your jewellery at home, you need to graduate from the “fingernail and a prayer” method. Adopting a professional’s approach means using the right tools. You don’t need a full jeweller’s bench, but three simple, inexpensive items will elevate your inspection from a guess to a diagnosis. These tools allow you to see what’s really going on with your settings and to test them in a controlled, non-damaging way.
The essential toolkit for any concerned jewellery owner is as follows:
- Tool 1: 10x Triplet Loupe. This is non-negotiable. A triplet loupe has three lenses to correct for chromatic and spherical aberration, giving you a clear, sharp view. To use it correctly, hold the loupe right up to your eye, then bring the jewellery towards the loupe until it comes into focus. This allows you to see the true shape of the beads and the contact points with the stone.
- Tool 2: LED Penlight. A small, bright light source is crucial for spotting cracks and checking security. Use it to perform the “shadowing technique”: hold the light at a low angle to the surface of the pavé. This will cast tiny shadows that can reveal hairline cracks in the metal or a gap between a prong and a stone that you’d miss with overhead lighting.
- Tool 3: Fine-tipped, non-magnetic tweezers. Forget the toothpick. A pair of fine-tipped tweezers gives you far more precision. Use them to perform a “nudge test” on any suspect stone. The key is to apply gentle, controlled pressure to the stone’s girdle, trying to rock it in its seat. You’re not trying to dislodge it, just to detect any hint of movement.
Beyond these physical tools, there is another powerful diagnostic technique you can use that requires only a quiet room and your sense of hearing. It’s a first-pass method many jewellers use at the take-in counter.
Case Study: The Sound Test Method for Multi-Stone Jewelry
This method is highly effective for any piece with multiple stones, like a pavé ring. In a quiet room, hold the ring close to your ear. With your other hand, gently tap the ring against the soft pad of your palm. A secure piece will produce a dull, solid “thud.” However, if a stone is loose, it will create a faint but distinct high-pitched “ticking” or “clicking” sound as the unsecured stone vibrates in its metal seat. Any internal sound should be treated as a confirmed loose stone until a jeweller proves otherwise. It’s a surprisingly sensitive and reliable initial test.
Equipped with these tools and techniques, you can perform a thorough and meaningful inspection at home, catching problems long before they become catastrophes.
Key takeaways
- The primary cause of lost pavé stones is gradual metal fatigue and wear on the small holding beads, not sudden impacts.
- Proactive inspection involves looking for signs of wear (flattened beads, rough texture) rather than just waiting for a stone to become loose.
- Choosing the right setting for your lifestyle (e.g., channel vs. pavé) and ensuring quality craftsmanship at purchase are the most effective preventative measures.
Why Does Micro-Pave Jewellery Require More Maintenance Than Solitaires?
The simple answer lies in a concept from engineering: points of failure. A classic solitaire ring, held by four or six prongs, has exactly that many points where a failure could lead to losing the stone. It’s a simple, robust system. Micro-pavé jewellery, on the other hand, is an entirely different beast. A single ring can have hundreds of tiny stones, each held by two to four minuscule beads. This multiplies the potential points of failure exponentially.
A stark jewellery engineering analysis reveals the difference in scale: a solitaire might have 4-6 critical failure points, while a micro-pavé band can have literally hundreds. Each one of those tiny beads is a potential weak link, susceptible to the same wear and tear from friction, impact, and even the snagging of fabric fibers while you sleep. The sheer number of components means that, statistically, something is far more likely to wear down and fail on a pavé piece than on a solitaire.
This design intricacy means that micro-pavé is inherently a high-maintenance style. It demands a more careful wearer and a more diligent maintenance schedule. It is not a “set it and forget it” style of jewellery. The responsibility falls on the owner to keep it clean, as a buildup of grime can accelerate wear, and to have it inspected regularly. The delicate balance of dozens of tiny components requires a commitment to its upkeep. While the visual reward is immense, it comes with the understanding that you are wearing a more fragile and complex piece of miniature engineering.
Embracing this reality is key to enjoying micro-pavé without constant anxiety. It’s not that it’s “badly made”; it’s that its very design—the thing that makes it so beautiful—also makes it more demanding. Accepting its need for regular check-ups and gentle handling is the price of that breathtaking, all-encompassing sparkle.
Now that you are equipped with a jeweller’s knowledge, the next logical step is to establish a consistent maintenance routine. Regular, proactive inspection is the single most effective way to ensure the longevity of your treasured pavé jewellery and prevent the heartbreak of a lost stone.
Frequently Asked Questions About How to Check Your Pave Setting for Loose Stones at Home?
How often will micro-pave diamonds need replacement?
It’s difficult to estimate how often a client will need diamond replacement because every person wears their jewelry differently; there is however, a direct correlation between how clean you keep your jewelry and how often you may need repairs.
Can I use ultrasonic cleaners on micro-pave?
The ultrasonic cleaner machine works well with rings as long as your ring does not have any pave diamonds or smaller diamonds. These cleaners can potentially shake out the smaller diamonds out of their setting.
Why is fabric particularly problematic for pave settings?
Fabric is perhaps a pavé settings’ worst nightmare. Fibers rubbing and catching on small prongs, even while you are asleep can cause the prongs to wear down more quickly, or even get caught and pull a prong away from a stone.