A cohesive mismatched ear is an art of composition, not just a random collection of jewelry.
- Success lies in balancing visual weight and establishing a clear thematic anchor to guide your choices.
- True mastery involves thinking like a stylist, using principles of rhythm, flow, and negative space to create a personalized story.
Recommendation: Start by choosing a dominant metal to act as your foundational canvas, then introduce accent shapes and textures that follow a consistent theme.
You’ve seen it everywhere: the artfully assembled “curated ear.” It’s that effortlessly cool collection of mismatched studs, hoops, and charms that tells a story up the length of the earlobe and cartilage. It whispers confidence and personal style. Yet, when you try to replicate it, the result often feels less like intentional eclecticism and more like you got dressed in the dark. The line between a chic, curated ear and a chaotic mess is frustratingly thin, leaving many fashion-forward individuals hesitant to dive in.
The common advice is often to stick to simple rules, like using a single metal colour or just balancing big with small. While not wrong, this advice only scratches the surface. It misses the core philosophy that high-end piercing stylists use to transform an ear into a living gallery. The secret isn’t about rigid matching or following a formula. It’s about understanding the subtle language of jewelry composition. It involves a deeper appreciation for concepts like visual weight, thematic harmony, and the rhythmic flow that guides the eye across your personal canvas.
But what if the key wasn’t about the earrings themselves, but how they interact with each other and the unique anatomy of your ear? This guide moves beyond the basics. We’re going to explore the professional techniques for creating a mismatched look that feels deliberate, balanced, and deeply personal. We’ll deconstruct the elements of a successful curation, from establishing a foundational theme and mastering the ratio of hoops to studs, to the critical, non-negotiable rules of piercing aftercare that protect your art. Prepare to stop collecting earrings and start composing them.
This article breaks down the core principles of intentional ear curation. Explore the topics below to master the art of creating a look that is both eclectic and harmonious, from foundational metal choices to the final, sleep-proof details.
Summary: Mastering the Art of Intentional Ear Stacking
- Why Should You Stick to One Metal Colour When Mixing Earring Shapes?
- Hoops and Studs: What is the Golden Ratio for Ear Curation?
- Celestial or Geometric: How to Choose a Theme for Your Mismatched Set?
- The Error of Rotating Jewellery Between Healed and Unhealed Piercings
- Where to Buy Single Earrings If You Don’t Want a Pair?
- How to Stop French Hook Earrings from Falling Out of Your Ears?
- How to Arrange Loops from 10mm to 6mm for a Curated Ear Look?
- How to Choose Single Loop Earrings You Can Sleep In Comfortably?
Why Should You Stick to One Metal Colour When Mixing Earring Shapes?
The old rulebook says to pick a metal—gold, silver, or rose gold—and commit. From a stylist’s perspective, this isn’t a rule; it’s a foundational technique. Using a single metal colour is the easiest way to create an instant sense of cohesion. It acts as the canvas, allowing the different shapes, textures, and sizes of your earrings to be the focus without creating visual noise. When your metals match, a tiny star stud, a chunky huggie, and a delicate chain all speak the same language, even if their stories are different. This creates a unified aesthetic baseline that makes your curation look intentional and thoughtfully composed.
However, the most modern and artistic approach involves breaking this rule with intention. Mixing metals is an advanced move, but when done correctly, it adds a layer of depth and personality that a monochrome look can’t quite achieve. The key is to avoid a random 50/50 split. Instead, apply the 80/20 rule: choose one dominant metal that makes up about 80% of your look and use a second metal for the remaining 20% as a strategic accent. This contrast creates a focal point. Interestingly, some of the most popular pairings seen by jewelry retail experts are 18-karat yellow gold and oxidized silver, which offers a bold, high-contrast vibe. Another pro tip is to use a “bridge” piece—a single earring that incorporates both metals—to tie the whole look together seamlessly.
Hoops and Studs: What is the Golden Ratio for Ear Curation?
There isn’t a single “golden ratio” for hoops and studs that fits every ear, because the perfect balance is deeply personal and depends on your ear’s anatomy and the story you want to tell. However, a great starting point for achieving visual harmony is to think about visual weight and rhythmic flow. Instead of counting pieces, consider their perceived mass. A large, thick hoop has more visual weight than a tiny diamond stud. The goal is to distribute this weight in a way that feels balanced but not perfectly symmetrical. A common and effective strategy is to place heavier pieces (like larger hoops) in the lobe, which can support them, and lighter pieces (studs, tiny huggies) ascending the cartilage.
The celebrated piercer Maria Tash, a pioneer in the field, doesn’t focus on a numerical ratio but on a “forward-facing” aesthetic. This technique involves angling piercings so the jewelry best flatters the wearer’s anatomy, creating a dynamic flow. As one case study on her work explains, it’s about creating a visual rhythm, like arranging diamond petals to look as if they are ‘landing’ in different parts of the ear. This highlights the importance of working with, not against, the natural curves of your ear. A great rule of thumb for composition is the 2:3 ratio: for every two lobe piercings, consider three in the upper ear, or vice versa, to create an interesting and balanced asymmetry.
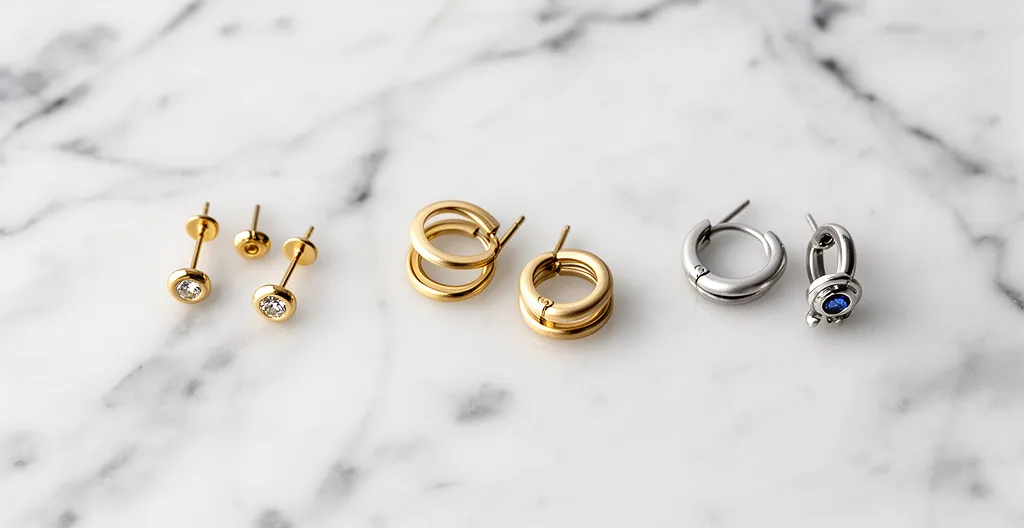
This principle of balancing different forms is key to a successful curation. The image below illustrates how graduated hoop sizes can be complemented by delicate studs to create a harmonious flow and balance visual weight.
As you can see, the arrangement feels cohesive because the eye is naturally drawn from the largest element at the bottom to the smallest at the top, creating a pleasing and intentional visual journey.
Celestial or Geometric: How to Choose a Theme for Your Mismatched Set?
Choosing a theme is like picking a genre for your ear’s story; it’s the single most powerful tool for ensuring your mismatched collection feels cohesive. A theme acts as the thematic anchor, a unifying concept that ties disparate elements together. Even if you mix metals, sizes, and styles, a shared theme ensures every piece feels like it belongs. The two most popular and versatile themes are celestial (stars, moons, suns, constellations) and geometric (lines, circles, triangles, chevrons). Celestial themes often evoke a dreamy, bohemian, or mystical vibe, while geometric themes lean more modern, minimalist, or edgy.
As the Swarovski Design Team notes in their style guide, this trend is about self-expression. They suggest starting by simply mixing two of your favorite sets to see how it feels. A great way to find your theme is to look at your personal style archetype. Are you a minimalist, a bohemian, or do you have a more classic or edgy look? Once you identify your core style, you can select a theme that amplifies it. For example, a minimalist might opt for clean linear bars and single star studs, while someone with a bohemian style could embrace ornate sunbursts and organic, asymmetric shapes. Don’t be afraid to mix them either; pairing star clusters with Art Deco patterns can create a uniquely sophisticated look.
The following guide can help you align a theme with your personal style. As this comparative analysis shows, each archetype has a natural interpretation within these popular themes.
| Style Archetype | Celestial Interpretation | Geometric Interpretation | Mixed Theme Approach |
|---|---|---|---|
| Minimalist | Single star studs, crescent moon outlines | Clean bars, simple triangles | Combine moon phases with linear elements |
| Bohemian | Ornate suns, constellation patterns | Organic hexagons, asymmetric shapes | Mix celestial symbols with tribal geometry |
| Classic/Elegant | Refined stars, delicate moons | Perfect circles, symmetrical squares | Pair star clusters with Art Deco patterns |
| Edgy/Modern | Abstract comets, sharp star points | Deconstructed shapes, angular forms | Combine spike stars with fragmented triangles |
The Error of Rotating Jewellery Between Healed and Unhealed Piercings
This is the most critical rule in the world of piercing, and it is non-negotiable: never move jewelry from a healed piercing into one that is still healing. It may seem harmless, especially if you’re cleaning the earring, but you are creating a perfect storm for a serious infection. Your healed piercings have a stable, established microbiome. Bacteria from this environment form a sticky, invisible layer called a biofilm on your jewelry. When you transfer that earring into a fresh, open wound (which is what an unhealed piercing is), you’re essentially transplanting a fully formed bacterial colony directly into vulnerable tissue. This dramatically increases the risk of irritation, prolonged healing, and severe infection.
A new piercing is an open channel that requires a sterile environment to heal properly. The initial jewelry, known as “healing jewelry,” should be made of implant-grade biocompatible materials like titanium (ASTM F-136), niobium, or solid 14k+ gold. These materials are specifically chosen because they are inert and won’t cause reactions. This jewelry should not be touched, rotated, or changed for the entire healing period. This can range from 6-8 weeks for a simple lobe piercing to 6-12 months for a cartilage piercing like a helix or conch. Patience is not just a virtue here; it’s a medical necessity for the long-term health and success of your curated ear.
Your Action Plan: How to Know Your Piercing is Healed
- Check for visual cues: Confirm there is absolutely no redness, swelling, or tenderness to the touch around the piercing site.
- Inspect for discharge: Ensure no “crusties” (dried lymph fluid) or any form of discharge are forming on the jewelry or skin.
- Feel the channel: The piercing channel itself should feel firm and established when you gently palpate the area, not soft, fleshy, or raw.
- Perform a movement test: You should be able to gently move the jewelry back and forth without any pain, pinching, or resistance.
- Validate the timeline: Confirm that you have surpassed the minimum recommended healing time for that specific piercing location (e.g., 8+ weeks for lobes, 6+ months for cartilage).
Where to Buy Single Earrings If You Don’t Want a Pair?
The rise of the curated ear has completely transformed the jewelry market. For decades, earrings were sold almost exclusively in symmetrical pairs. Now, the demand for asymmetry and personalization has created a thriving market for single earrings. You no longer have to buy a pair just to get the one piece you need for your stack. High-end piercing studios and specialized jewelry brands are the best places to start. Brands like Maria Tash, Studs, and Irene Neuwirth have built their businesses around the concept of the curated ear, offering extensive collections of single studs, hoops, and charms designed specifically for mixing and matching.
This shift isn’t just a niche trend; it’s a fundamental change in how people buy jewelry. As a case study on the singles market highlights, major fine jewelry designers like Sydney Evan and Jennifer Meyer now intentionally create asymmetrical sets and robust single earring collections. This trend is global, with reports showing that in some markets, up to 40% of jewelry sales now occur online with customization options, catering directly to consumers who want to build a unique look piece by piece. Beyond these specialized retailers, don’t overlook artisan markets, vintage shops, and platforms like Etsy. These can be treasure troves for finding truly unique, one-of-a-kind pieces that add character and a personal story to your collection.
Building a collection piece by piece is an artistic endeavor. Sourcing unique single earrings allows you to treat your ear like a canvas, adding elements over time to create a truly personal gallery.
Ultimately, the best places to buy single earrings are those that celebrate individuality and craftsmanship, allowing you to curate a collection that is as unique as you are.
How to Stop French Hook Earrings from Falling Out of Your Ears?
French hooks, also known as fish hooks, are elegant and effortless, but they come with a notorious flaw: they can easily slip out and get lost, especially with heavier dangles or during active moments. The simplest and most common solution is to use a stopper. These tiny additions provide the friction needed to keep the hook securely in place. The most discreet option is a clear silicone or rubber stopper, which slides onto the back of the hook and is nearly invisible. They are lightweight, comfortable, and perfect for daily wear with lighter earrings.
For more valuable or heavier earrings, you may want to upgrade your security. A metal bullet clutch, similar to the back of a stud earring, offers a much more secure grip. While more visible, a sleek gold or silver clutch can look like an intentional part of the design. For maximum security, you can even find leverback converters that transform your French hook into a fully closed loop. Another DIY technique for a quick fix involves slightly tightening the curve of the hook itself. Using round-nose jewelry pliers (never flat ones, which will mar the metal), you can gently squeeze the hook to create a more pronounced curve. This increases the tension against your earlobe, making it less likely to swing free. Just be sure to make small, incremental adjustments to avoid over-stressing the metal.
The security of your earring back is a trade-off between visibility, comfort, and peace of mind. This guide, sourced from an earring style analysis, breaks down the pros and cons of common stopper types.
| Stopper Type | Security Rating | Comfort Level | Best For | Visibility |
|---|---|---|---|---|
| Clear Silicone | 6/10 | 9/10 | Light earrings, daily wear | Nearly invisible |
| Metal Bullet Clutch | 9/10 | 7/10 | Heavy dangles, active wear | Visible but sleek |
| Decorative Stoppers | 7/10 | 8/10 | Fashion statement | Intentionally visible |
| Leverback Converters | 10/10 | 8/10 | Maximum security | Changes earring style |
How to Arrange Loops from 10mm to 6mm for a Curated Ear Look?
Arranging a series of graduated hoops is a classic and highly effective way to create a sophisticated curated ear. The most common and visually pleasing method is the “gradient effect.” This involves placing the largest hoop (10mm) in the first lobe piercing, which is typically the lowest and can handle the most visual weight. From there, you decrease the size with each subsequent piercing, creating a flow: 10mm in the first, 8mm in the second, and 6mm in the third. This creates a natural, tapering look that follows the curve of the ear and draws the eye upward in a smooth, rhythmic motion.
For a more advanced and dynamic look, you can intentionally break this pattern. Professional piercers sometimes use a “swell” effect to create a unique point of interest. As a professional curation guide explains, this could look like a 10mm → 8mm → 6mm → 8mm arrangement. That final, slightly larger hoop disrupts the predictable gradient and adds an unexpected compositional element, all while maintaining the overall harmony of the set. Spacing is also key; the physical distance between the hoops should appear to decrease slightly as the hoops themselves get smaller, enhancing the tapering effect. This attention to detail in spacing and arrangement is what separates a standard stack from a truly curated composition.
The earring market is continuously expanding to cater to this desire for personalization, with Grand View Research reporting that the earring market is projected to grow significantly. This growth is fueled by consumers seeking more ways to customize their look, with graduated hoop sets being a cornerstone of this trend.
Key Takeaways
- Cohesion comes from a thematic anchor (like celestial or geometric shapes), not perfect matching.
- Use a single metal color as your foundation, or mix metals using an 80/20 rule for intentional contrast.
- Respect your anatomy and the healing process; never swap jewelry into an unhealed piercing.
How to Choose Single Loop Earrings You Can Sleep In Comfortably?
The dream is a curated ear that you can wear 24/7, but the reality is that many earring styles are a nightmare to sleep in. The key to comfort lies almost entirely in the closure mechanism and the material. For sleeping, you need earrings that are smooth, low-profile, and won’t poke or snag. The undisputed champions of sleep comfort are flat-back labrets and seamless clicker rings. Flat-back labrets feature a flat disc on the back instead of a traditional butterfly back, eliminating any jabbing. They are the standard for initial cartilage piercings for this very reason. Clicker rings are smooth, continuous loops with a tiny hinged segment that clicks shut, leaving no gaps or protruding parts.
Huggie hoops are another excellent option. These are small hoops that “hug” the earlobe, and their hinged closure is typically smooth and integrated into the design. When choosing any of these styles, material is paramount. Look for body-safe metals like implant-grade titanium or solid 14k+ gold, especially for newer piercings, as they are hypoallergenic and won’t cause irritation during prolonged wear. Avoid butterfly backs at all costs for sleeping. The post extends beyond the backing and is notorious for poking the sensitive skin behind your ear, leading to soreness and even potential injury over time.
Finding the right sleep-proof earring is a matter of prioritizing a secure and smooth closure. This comfort rating guide, based on an ear piercing planner, compares the most common closure types.
| Closure Type | Sleep Comfort | Security | Material Options | Price Range |
|---|---|---|---|---|
| Seamless/Clicker Rings | 9/10 | 10/10 | Titanium, Gold, Niobium | $$-$$$ |
| Flat-Back Labrets | 10/10 | 10/10 | Titanium, Gold | $$-$$$ |
| Huggie Hoops | 8/10 | 9/10 | All metals | $-$$$ |
| Butterfly Backs | 1/10 | 5/10 | All metals | $-$$ |
| Threadless Push-Pin | 9/10 | 9/10 | Titanium, Gold | $$-$$$ |
Now that you’re armed with the principles of composition and the practicalities of wear, the next step is to start experimenting. Begin by inventorying your current collection and see what stories you can start telling on your own canvas.
Frequently Asked Questions on How to Curate a “Mismatched” Earring Look That Still Feels Cohesive?
Why is biofilm transfer a risk when rotating jewelry?
Bacteria from healed piercings colonize on jewelry surfaces and create biofilms. When this jewelry is moved to an unhealed piercing, it introduces established bacterial colonies into a fresh wound, significantly increasing infection risk.
How long should healing jewelry remain untouched?
Healing jewelry should remain in place for 6-12 months depending on the piercing location. Lobe piercings typically heal in 6-8 weeks, while cartilage piercings can take 6-12 months for complete healing.
What materials are safe for healing piercings?
Only implant-grade titanium (ASTM F-136), niobium, or solid 14k+ gold should be used during healing. These materials are biocompatible and won’t cause allergic reactions or irritation.