The secret to perfect bridal jewellery isn’t matching it to your neckline, but creating a cohesive story with your dress’s fabric and your day’s events.
- Fabric texture (like satin or lace) dictates the ideal jewellery finish (pearls or diamonds).
- Your accessory needs can change from ceremony to reception, allowing for dynamic style choices.
Recommendation: Finalize jewellery choices *after* your first dress fitting to ensure perfect harmony with the confirmed neckline and silhouette.
That moment you find “the dress” is pure magic. But soon after, a new wave of questions arrives: what jewellery will complete the look? For many brides-to-be, the sheer volume of choices can feel overwhelming. The internet is filled with simple, static rules: a V-neck calls for a pendant, a strapless dress for a statement necklace. While these guidelines have their place, they often overlook the richer details that truly elevate a bridal look from beautiful to unforgettable. They don’t consider the intricate dialogue between the lustre of satin and the glow of a pearl, or the way a delicate tiara can honour your unique facial structure.
True bridal styling is not about following a rigid formula. It’s about crafting a personal style narrative where every element works in harmony. What if the key wasn’t just the shape of your neckline, but the texture of your dress’s fabric? What if you planned your jewellery not for one static look, but for the dynamic flow of your entire wedding day, from the solemnity of the ceremony to the joy of the reception? This is where the real artistry begins, transforming your accessories from a mere finishing touch into a core part of your story.
This guide is designed to be your personal bridal stylist, moving beyond the basics to give you an organized framework for your decisions. We will explore how to create a look that feels authentic, considered, and uniquely you, ensuring every piece you choose contributes to your radiant confidence on your special day.
To help you navigate these choices, this article breaks down the key strategic considerations. From the financial sense of renting high jewellery to the art of styling a full parure, each section will provide you with the expert insights needed to build your perfect bridal ensemble.
Table of Contents: A Bride’s Jewellery Coordination Guide
- Why Renting High Jewellery for Your Wedding Might Save You £2,000?
- How to Wear a Tiara Without Overwhelming Your Facial Features?
- Lace or Satin: Which Dress Fabric Calls for Pearls Instead of Diamonds?
- The Mistake of Mixing Metal Colours Between Your Ring and Bridal Set
- When Should You Buy Your Bridal Jewellery in Relation to Dress Fittings?
- Chandelier or Linear Drop: Which Style Suits a Black Tie Event?
- How to Stack Three Necklaces Without Them Tangling in 10 Minutes?
- How to Wear a Full Parure to a Black Tie Event Without Looking Costume-y?
Why Renting High Jewellery for Your Wedding Might Save You £2,000?
The dream of wearing breathtaking diamonds on your wedding day often collides with the reality of a carefully planned budget. The “forever” aspect of purchasing fine jewellery is romantic, but it’s not the only path to achieving a high-impact look. Today, a growing number of brides are embracing a financially savvy and stylistically flexible alternative: renting. This approach reframes jewellery not just as a lifelong investment, but as a peak experience for a once-in-a-lifetime event. Renting allows you to access a level of luxury—think designer diamond earrings or a show-stopping necklace—that might otherwise be unattainable.
Consider the cost-per-wear. A £3,000 pair of diamond earrings may seem like a worthy splurge, but if they are too formal for your everyday life, their true cost remains high. Renting those same earrings for a fraction of the price, perhaps a few hundred pounds, suddenly becomes a very logical decision. It frees up a significant portion of your budget for other wedding priorities, like the honeymoon or guest experiences, without compromising on your bridal vision.
Verstolo Bridal Rental Success Story
The benefits of this model are perfectly illustrated by the experience of a recent bride. As detailed in a case study by Verstolo, Hannah B., a 2024 bride, rented diamond earrings for her destination wedding. The pieces, which would have retailed for over $10,000, cost her under $200 to rent. The process included seamless shipping directly to her hotel and a prepaid return label, eliminating logistical stress. She described feeling “like a princess” on her wedding day, able to wear luxury diamonds she couldn’t have afforded to purchase, making the rental a key part of her joyful experience.
This approach isn’t just about saving money; it’s about maximizing impact. You can choose a piece that is perfectly, unapologetically “bridal” without worrying about its post-wedding usability. It’s a strategic choice that prioritizes the memory and the photos, ensuring you look and feel your absolute best on the day that matters most. Before committing to a large purchase, it’s worth exploring the world of high jewellery rental.
How to Wear a Tiara Without Overwhelming Your Facial Features?
A tiara is the ultimate bridal statement, a symbol of fairytale romance and regal elegance. However, its power to transform also comes with the risk of overwhelming your look if not chosen carefully. The secret to wearing a tiara successfully lies in moving beyond the idea of it as a simple accessory and instead considering its relationship to your unique facial architecture. It’s not just about matching the tiara to your dress, but ensuring it harmonizes with your face shape, hairstyle, and overall proportions to enhance your natural beauty rather than competing with it.
The goal is balance. A tiara should draw the eye upward and add a touch of sparkle, not dominate your face. For instance, a bride with a rounder face might find that a tiara with some height or a gentle peak in the center creates an elongating effect. Conversely, a bride with a longer face shape may prefer a wider, band-style tiara that adds horizontal emphasis. The key is to select a piece that complements your bone structure, creating a sense of harmony and grace.
Placement is just as crucial as the style itself. A common mistake is wearing the tiara too far forward, like a crown, which can look costume-y. The most flattering position is typically further back on the head, nestled into the hairstyle. This placement makes the tiara feel like an integrated part of your look, adding a celestial glow without overpowering your features. As the illustration above shows, when properly positioned, it should sit comfortably and appear as a natural extension of your bridal hairstyle.
This detailed tiara selection guide provides a clear framework for choosing the right style based on your facial features.
| Face Shape | Recommended Tiara Style | Height/Width | Avoid |
|---|---|---|---|
| Round | V-shaped or peaked center | Taller designs to elongate | Flat band styles |
| Oval | Any style works | High-peaked or subtle arch | No restrictions |
| Square | Curved designs | Some height with curves | Straight-across styles |
| Long | Band-style or minimal peaks | Wider, horizontal spread | Very tall designs |
| Heart | Delicate, low profile | Minimal width at forehead | Wide, heavy styles |
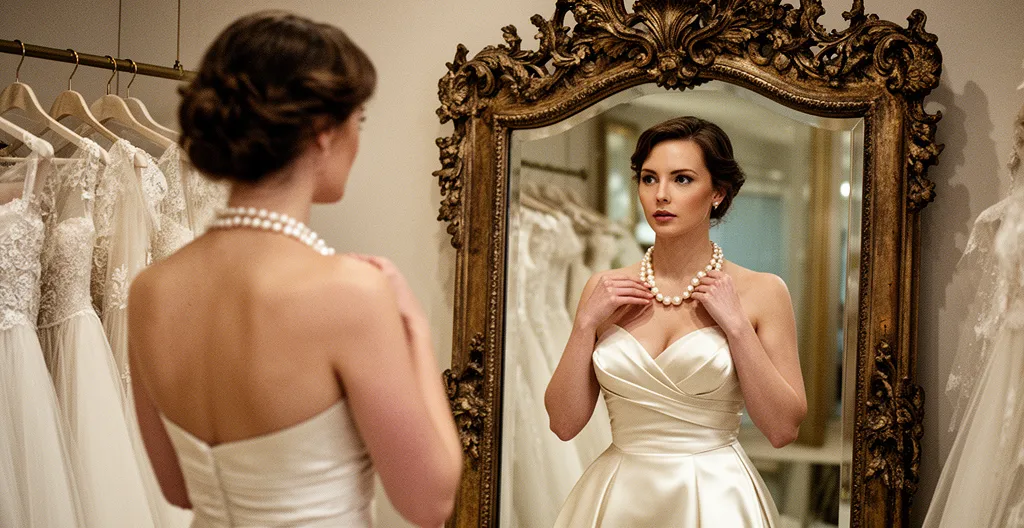
Lace or Satin: Which Dress Fabric Calls for Pearls Instead of Diamonds?
While the neckline of your dress provides the structural frame for your jewellery, the fabric provides the soul. The material of your gown—its texture, sheen, and weight—engages in a subtle “textural dialogue” with your accessories. Ignoring this conversation is a missed opportunity for creating a truly cohesive and sophisticated look. The question isn’t simply “pearls or diamonds?” but rather, “what does my dress’s fabric need to complete its story?” A gown with a high-lustre finish, like satin or mikado, already commands significant attention. Pairing it with equally brilliant diamonds can create “shine competition,” where the eye doesn’t know where to focus.
In this scenario, pearls are often the perfect counterpart. Their soft, diffused glow complements the shine of the fabric without competing against it. The matte finish of a pearl provides a beautiful contrast to the high gloss of satin, adding a layer of organic warmth and timeless elegance. This principle of contrast is a powerful styling tool. Conversely, a matte fabric like crepe might be the perfect canvas for the brilliant fire of a diamond, as the gem provides the sparkle that the fabric lacks.
Allure Bridals Style E457 Fabric-Jewelry Pairing
A perfect example of this principle in action is seen with Allure Bridals’ Style E457. According to an analysis from their stylists, the ballgown’s structured satin bodice and voluminous skirt were best complemented by opera-length pearls. The pearls’ soft glow harmonized with the fabric’s lustre, whereas diamonds would have created distracting shine points. This thoughtful pairing allowed the dress’s grand silhouette to remain the star, proving that the right jewellery enhances the gown rather than overshadowing it. This combination became their most-requested look for formal evening weddings in 2024.
For textured fabrics like lace, the primary concern is physical as well as aesthetic. Ornate jewellery with prongs or sharp edges can easily snag on delicate embroidery. Here, smooth bezel-set gems or, again, classic pearls are a safe and elegant choice. They honour the romantic, detailed nature of the lace without posing a risk. The key is to let the fabric lead the way in your jewellery selection.
The Mistake of Mixing Metal Colours Between Your Ring and Bridal Set
One of the most persistent “rules” in bridal jewellery is the need for all metals to match perfectly: if your engagement ring is platinum, everything else must be platinum. While this creates a clean, traditional look, strictly adhering to this rule can feel limiting and may not reflect modern sensibilities. The idea that mixing metals is a “mistake” is outdated. In fact, an intentional mix of metals can add depth, warmth, and a personal touch to your bridal set. The key is to approach it not as an accident, but as a deliberate styling choice.
As the editorial team at The Knot points out, “Mixing metals is predicted to be one of the biggest jewelry trends of 2024. However, if you do prefer a more coordinated look, the color of your engagement ring can certainly help guide your search for the perfect wedding jewelry.” The modern approach isn’t about rigid rules, but about creating harmony. The goal is to make the mix look intentional and curated, not random. This can be achieved by following a simple framework, like the 80/20 strategy.
This strategy suggests that one metal should be dominant (about 80% of your look), typically dictated by your engagement ring. The other 20% can be an accent metal. For example, if you have a platinum engagement ring, you could pair it with a platinum necklace and earrings, but add a delicate rose gold bracelet as your accent piece. Another technique is to use a “bridge piece”—a bracelet or earrings that incorporate both metals, which serves to unify the entire look. The dress color also plays a role; crisp white gowns pair beautifully with cool metals (platinum, silver), while ivory or champagne dresses are a natural match for the warmth of yellow or rose gold, and can easily accommodate a mixed-metal palette.
The fear of mixing metals often stems from a lack of a clear strategy. By using a framework like the one suggested in Brilliant Earth’s styling guide, you can confidently create a look that is both sophisticated and uniquely personal. Don’t be afraid to let your personal style shine through by thoughtfully combining different metal tones.
When Should You Buy Your Bridal Jewellery in Relation to Dress Fittings?
In the whirlwind of wedding planning, it can be tempting to tick “buy jewellery” off your list early on. However, purchasing your accessories too soon—before your dress and its alterations are finalized—is a common and potentially costly misstep. Your jewellery is not a standalone element; it is the final piece of a puzzle. Its success depends entirely on its relationship with your gown’s final, altered neckline, fabric, and overall silhouette. The perfect necklace for the sweetheart neckline you chose in the showroom might not work if alterations change it to a more defined V-neck.
The ideal timeline for purchasing your bridal jewellery is therefore intrinsically linked to your dress fitting schedule. You should begin browsing and identifying styles you love as soon as you’ve chosen your dress. However, the final decision and purchase should only happen after your first dress fitting. At this appointment, the neckline will be confirmed, and any major alterations to the silhouette will be underway. This gives you the concrete information you need to select pieces that will be in perfect harmony with the dress you will actually wear on your wedding day.
Verstolo Bride’s Timeline Success Story
A 2024 bride’s experience highlights the importance of this flexible timing. She scheduled her first jewellery consultation six months before her wedding, right after her first fitting confirmed the neckline. She reserved her rental pieces but maintained the ability to swap styles. When a later alteration changed her neckline slightly, the styling team conducted a virtual consultation four weeks before the wedding to adjust her earring selection. This ability to modify choices up until two weeks before the wedding eliminated the stress of a premature commitment and ensured flawless coordination.
Bringing your chosen or potential jewellery to your final dress fitting (usually around 6 weeks before the wedding) is a non-negotiable step. This is your only chance to see the complete look together and make any final adjustments. It allows you to check for comfort, movement, and how the metals interact with the color and texture of your dress in person. Rushing this process can lead to regret, while a patient, strategic approach guarantees a picture-perfect result.
Your Action Plan: The Ideal Bridal Jewelry Purchase Timeline
- 6 months before: Begin browsing jewellery styles and identify your preferences right after you’ve selected your dress.
- After first fitting: With the neckline and major alterations confirmed, you can now confidently select your primary jewellery styles.
- 3 months before: Purchase or reserve your jewellery. Opt for retailers or rental services with flexible return or exchange policies.
- 6 weeks before: Bring all your selected jewellery to your final dress fitting to check for overall coordination and comfort.
- 2 weeks before: Finalize all your jewellery choices. Do a test wear at home to ensure everything feels secure and comfortable for a long day.
Chandelier or Linear Drop: Which Style Suits a Black Tie Event?
For a formal black-tie wedding, the choice of earring is paramount, especially if you’re opting for an updo or forgoing a necklace. Both chandelier and linear drop earrings bring elegance and drama, but they serve different purposes and suit different moments of the day. This is where the concept of dynamic curation comes into play: choosing your jewellery not for a single, static look, but for the evolving needs of your celebration. The best choice depends on what you want to prioritize: maximum visual impact for photos or comfortable movement for the reception.
Chandelier earrings are the epitome of glamour. With their width and intricate design, they are unmatched in their ability to frame the face and catch the light. They are a photographer’s dream, creating breathtaking impact in formal portraits and during the ceremony. Their structure adds a sense of occasion and works beautifully with more structured gowns or when you want the earrings to be the main focal point of your accessories. However, their weight and volume can sometimes be a consideration for a long night of dancing.
Linear drop earrings, on the other hand, offer a sleek, modern, and often more comfortable alternative. Their streamlined design elongates the neck and provides a sophisticated sparkle that moves beautifully with you. They are the perfect choice for a bride who wants to feel unencumbered on the dance floor. While they may have a more subtle presence in wide-shot photos, their elegant movement creates a captivating effect in person and in more candid moments.
The Two-Earring Strategy: A Movement Test for Black Tie Events
A 2024 trend report from Verstolo analyzed earring choices at over 50 black-tie weddings and discovered a brilliant solution. They found that while chandelier earrings excelled in formal portraits, brides who prioritized dancing consistently reported that linear drops offered superior comfort. This led to the rise of the “two-earring strategy.” Many brides now rent both styles: they wear the dramatic chandeliers for the ceremony and photos, then switch to the lighter, more secure linear drops for the reception. This approach allows a bride to have the best of both worlds, maximizing visual impact when it matters most and ensuring absolute comfort for the celebration that follows.
How to Stack Three Necklaces Without Them Tangling in 10 Minutes?
The art of necklace stacking, or layering, has become a beautiful way for brides to add a touch of personal, modern style to their wedding look. It works particularly well with simple necklines like a sweetheart, scoop, or V-neck, where there is a clear canvas to work with. However, the fear of a tangled, messy chain of necklaces is real. The secret to a perfect, tangle-free stack lies in a methodical approach that considers three factors: length, weight, and texture. A successful stack looks effortless, but it is always intentional.
The first rule is to ensure a clear difference in length. A 2-inch (or 5cm) gap between each necklace is ideal. For example, a common and flattering combination is a 16-inch, 18-inch, and 20-inch set. This spacing gives each piece its own “breathing room” and prevents them from immediately overlapping and twisting. The second rule is to anchor the stack with weight. Start by putting on your longest necklace first, and make sure it has the heaviest pendant or charm. This anchor will help pull the other chains downward and keep them in place.
Finally, consider the texture of the chains themselves. Mixing different chain styles—for example, a delicate snake chain, a classic link chain, and a beaded chain—can actually help prevent tangling. The different textures create a subtle friction that keeps them from sliding over each other too easily. For a guaranteed tangle-free experience, a necklace spacer clasp is an invaluable tool. This small device has multiple rings on one bar, allowing you to attach each necklace separately at the back of your neck, keeping them perfectly spaced and secure all day long.
With this simple, methodical approach, you can create a beautifully curated necklace stack in under ten minutes, adding a layer of personality and chic elegance to your bridal look.
Your Action Plan: 10-Minute Tangle-Free Necklace Stacking
- Minutes 1-2: Select three chains with distinct length differences, aiming for at least 2 inches between each (e.g., 16″, 18″, 20″).
- Minutes 3-4: Begin with your heaviest pendant on your longest chain. This will serve as the anchor for your stack.
- Minutes 5-6: Add your medium-length, medium-weight piece. Try to choose a contrasting chain style for added texture.
- Minutes 7-8: Top off the stack with your lightest and shortest piece, such as a delicate chain or a simple choker.
- Minute 9: Secure all three necklaces to a necklace spacer clasp at the back to maintain perfect spacing and prevent twisting.
- Minute 10: Check your reflection, adjust the placement of each necklace, and do a gentle movement test to ensure they sit comfortably.
Key Takeaways
- Fabric First: Let your dress’s fabric texture and sheen—not just the neckline—guide your choice between the soft glow of pearls and the brilliant fire of diamonds.
- Timing is Everything: Do not finalize your jewellery purchase until after your first dress fitting to ensure perfect harmony with the confirmed, altered neckline.
- Consider the Experience: Renting high jewellery offers a financially savvy way to wear spectacular pieces for your wedding day without the long-term investment, maximizing impact on a budget.
How to Wear a Full Parure to a Black Tie Event Without Looking Costume-y?
A parure—a full, matching set of jewellery, typically including a necklace, earrings, bracelet, and sometimes a brooch—can be the height of formal elegance. However, in modern bridal styling, wearing the entire set at once can sometimes feel dated or “costume-y,” especially if the pieces are elaborate. The contemporary approach to wearing a parure is one of deconstruction and curation. It’s about honoring the beauty of the coordinated set while making choices that feel fresh, personal, and perfectly balanced with your gown. The goal is to create one or two focal points, not to have every piece of jewellery competing for attention.
The first step is to choose your “hero” pieces. Typically, this means choosing between a statement necklace or statement earrings, but not both. As Olivia Landau, CEO of The Clear Cut, advises, “You don’t want your jewelry pieces to compete with each other or with your outfit, so focus on choosing pieces that are complementary. For example, if you have statement earrings, maybe skip the necklace and do a bracelet. If you do a statement necklace, maybe go for studs instead of bigger earrings.” This advice, highlighted in a guide from The Knot, is the cornerstone of modern parure styling.
You don’t want your jewelry pieces to compete with each other or with your outfit, so focus on choosing pieces that are complementary. For example, if you have statement earrings, maybe skip the necklace and do a bracelet. If you do a statement necklace, maybe go for studs instead of bigger earrings.
– Olivia Landau, The Clear Cut CEO on Wedding Jewelry Selection
Once you’ve selected your two or three main pieces (e.g., necklace and studs, or drop earrings and a bracelet), think creatively about the remaining elements. A beautiful brooch from the parure doesn’t have to be worn on your dress; it can be a stunning accent pinned to your bouquet’s ribbon or even on your clutch. A delicate bracelet could be repurposed as a unique hair accessory, woven into a chic low bun. By deconstructing the set and placing the elements thoughtfully, you maintain the cohesive elegance of the parure while creating a look that is entirely your own. This approach allows you to celebrate heirloom pieces or a new set in a way that feels both timeless and perfectly current.
With these frameworks in mind, you are now equipped to build your bridal jewellery story. Start by assessing your dress’s fabric, map out your timeline around your fittings, and confidently select the pieces that will not just accessorize your look, but elevate it into a true reflection of you.