Wearing bold jewellery with knitwear is less about matching and more about understanding the physics of metal and fabric.
- Cuffs snap due to ‘work hardening’—repeated bending makes metal brittle, so a perfect initial fit is crucial.
- Strategic placement on the forearm, not just the wrist, elongates your silhouette and prevents snags on delicate knits.
Recommendation: Prioritise one-time professional sizing and solid metals over plated options for jewellery that is built to last through many winters.
The first crisp day of autumn arrives, and with it, the familiar comfort of pulling on a favourite cashmere jumper. You feel chic, cosy, and ready for the season. But then comes the style dilemma: how to accessorise? That beautiful gold cuff, so effortless in summer, now presents a risk. Will it catch on the delicate fibres? Will it look bulky? Will constant adjustment to fit over the sleeve cause it to snap?
As a knitwear designer, I see this hesitation constantly. The fear of snagging a precious knit or breaking a piece of jewellery leads many to abandon their best accessories during the colder months. The common advice is often too simple, suggesting you just “push it on” or “choose something bold.” This ignores the fundamental interaction between a hard, rigid object and a soft, pliable fabric. True success in styling structural jewellery—pieces like cuffs, chokers, and even certain rings—with your winter wardrobe isn’t a matter of luck. It’s a science.
This guide moves beyond generic tips to give you a designer’s and a stylist’s perspective. We’ll delve into the material science of why metals break, the geometry of a perfect fit, and the strategic placement that transforms your look from awkward to elegant. By understanding the ‘why’ behind the ‘how’, you’ll learn to wear your most beloved pieces with confidence, no matter how chunky the knit.
We will begin with the most common challenge—the cuff over a sleeve—before expanding these principles to other structural jewellery pairings. This article provides a comprehensive framework for making your accessories and knitwear work in perfect harmony.
Contents: The Art of Structural Jewellery: Mastering Cuffs, Chokers, and Rings with Knitwear
- Why Does Squeezing Your Cuff to Fit Eventually Snap the Metal?
- How to Measure Your Wrist Gap so the Cuff Doesn’t Spin?
- Solid or Plated: Which Cuff Retains Its Shape Better Under Tension?
- The Error of Typing on a Laptop While Wearing a Chunky Metal Cuff
- Where to Position a Cuff on the Forearm to Elongate the Limb?
- The Error of Wearing a Choker with a Turtle Neck Jumper
- Why Does a Traditional Court Ring Cost More Than a Flat Band?
- How to Wear a Choker Without Shortening Your Neck Visually?
Why Does Squeezing Your Cuff to Fit Eventually Snap the Metal?
The tragic ‘snap’ of a beloved cuff bracelet is a familiar story. The cause isn’t a manufacturing flaw but a fundamental principle of metallurgy known as work hardening. Think of bending a paperclip back and forth; eventually, it breaks with very little effort. The same process happens to your jewellery. Each time you squeeze a cuff to tighten it over a sleeve or pry it open to remove it, you are introducing stress into the metal’s crystalline structure. This makes the metal harder but also significantly more brittle.
Precious metals like gold and silver are malleable in their pure state, but for jewellery, they are alloyed and tempered to achieve a specific hardness. For pieces designed to be adjusted, jewellery experts advise that cuff bracelets require 1/2-hard metal to offer a balance between form-holding and flexibility. However, even this carefully chosen temper has its limits. Repeated bending and unbending pushes the metal past its elastic limit into a state of fatigue, where a fracture becomes inevitable.
The solution is to treat a cuff not as an adjustable accessory, but as a perfectly sized, rigid object. The goal should be to find or have a cuff sized so that it can be slipped on and off over the narrowest part of your hand or wrist without needing to be bent. This preserves the metal’s integrity and ensures it won’t fail when you least expect it. Resisting the urge to “pinch to fit” is the single most important step in prolonging the life of your cuff.
This principle of preserving material integrity is the foundation of wearing structural jewellery successfully and for the long term.
How to Measure Your Wrist Gap so the Cuff Doesn’t Spin?
Once you accept that a cuff should not be repeatedly bent, the next step is achieving the perfect fit from the outset. A cuff that is too loose will spin around your arm, looking unkempt and feeling annoying, while one that is too tight is impossible to get on without force. The key is to measure the ‘wrist gap’—the opening in the cuff—to match your anatomy. This ensures the cuff stays securely in place, whether on bare skin or over a fine-gauge knit.
Forget measuring the circumference of your wrist with a tape measure; that’s for chain bracelets. For a rigid cuff, you need to measure the top-down width of your wrist bone. This is the most accurate measurement for determining the ideal internal diameter of the cuff.
As shown in the image, using a pair of calipers provides the most precise measurement. Place the calipers on either side of your wrist at its widest point (the two prominent bones). This dimension dictates the necessary diameter of the cuff. The gap, or opening, of the cuff should typically be between 2.5cm and 4cm, allowing you to slide it on at the narrowest part of your forearm, just above the wrist bone. For a cuff worn over a sleeve, you might add a few millimetres to the diameter, but the gap should remain consistent. A properly sized cuff feels like a part of you, not a loose ring you’re constantly readjusting.
Taking this small, precise step eliminates the main reason people are tempted to bend their cuffs, thus protecting the jewellery and creating a much more polished look.
Solid or Plated: Which Cuff Retains Its Shape Better Under Tension?
When a cuff is worn over knitwear, it’s under constant, low-level tension. The fabric pushes against the metal, testing its ability to retain its original, perfect circle or oval shape. This is where the choice between a solid precious metal cuff and a plated one becomes critical, not just for appearance, but for structural integrity. While a plated cuff may seem like a cost-effective choice, it often fails under the pressures of real-world wear.
A plated cuff typically has a core of a rigid base metal like brass, which is then coated with a thin layer of gold. According to a comparison from jewellery suppliers Fire Mountain Gems, this rigid core initially resists bending. However, any adjustment or sustained pressure can cause micro-cracks in the inflexible plating, leading to flaking and an unsightly appearance. Once the plating is compromised, the piece is effectively ruined.
A solid gold cuff, by contrast, is more forgiving. While gold is inherently softer, its alloy determines its durability. For instance, metallurgy research shows that 18k gold rates 2.75 on the Mohs scale, while 14k gold is harder, rating between 3.5 and 4. This means a 14k solid gold cuff will better resist scratches and minor deformation. More importantly, a solid gold cuff can be professionally reshaped or re-polished multiple times over its life without risk of flaking. It’s an investment in longevity and is far better suited to the dynamic tension of being styled over clothing.
Ultimately, for a cuff intended to be a long-term staple worn in various ways, solid metal offers superior resilience and value, ensuring it retains its intended shape for decades.
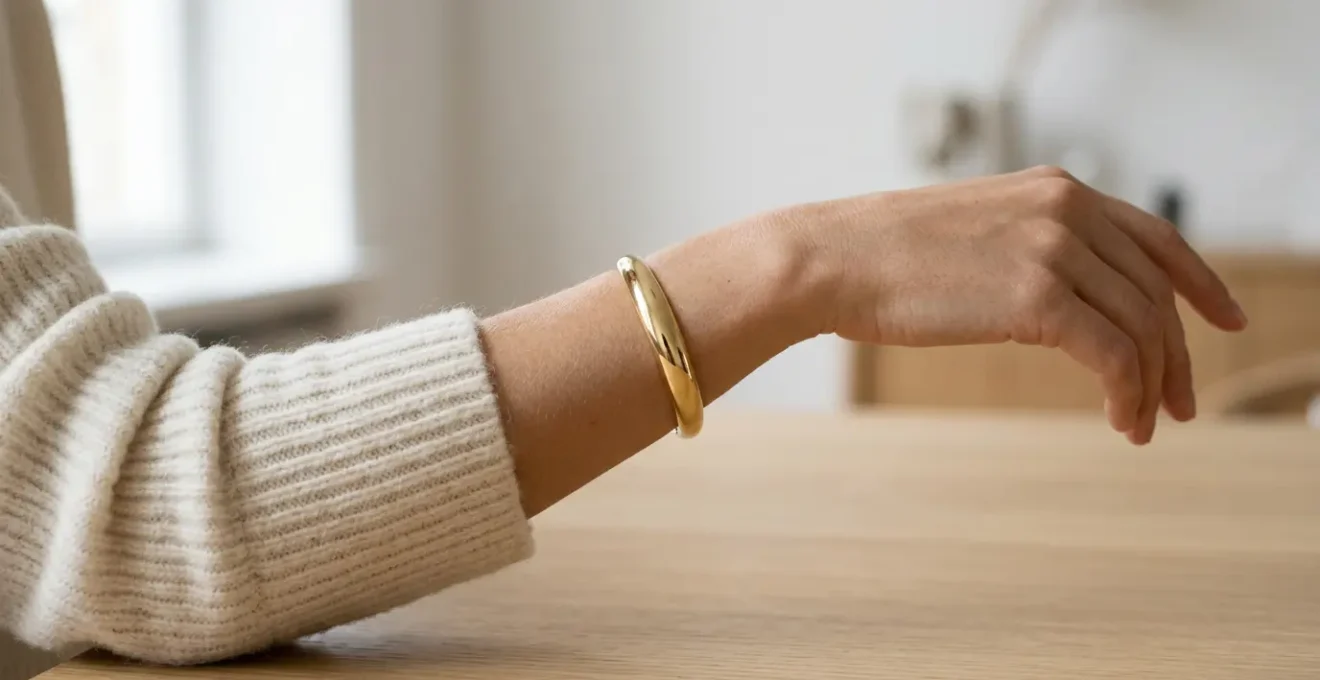
The Error of Typing on a Laptop While Wearing a Chunky Metal Cuff
One of the most common complaints from cuff wearers is the clatter and inconvenience of wearing one while working at a desk. A chunky metal cuff constantly knocks against the laptop or desk, creating a distracting noise and risking scratches to both the jewellery and the equipment. This practical annoyance leads many to abandon their bracelets at the office altogether. However, the solution isn’t to leave your jewellery at home, but to adopt a more strategic approach to wearing it during the workday.
The error lies in thinking the cuff must remain at the wrist at all times. By repositioning it, you can easily integrate it into a professional wardrobe without compromising on function. Sliding the cuff up the forearm is the simplest and most elegant solution.
As this image demonstrates, moving the cuff to the mid-forearm, just below the elbow, keeps the wrist area completely free for typing and other tasks. It transforms the piece from a functional hindrance into a deliberate style statement, drawing attention to the sleeve and creating a new focal point. For this to work, the cuff must be properly sized so it sits securely on the muscular part of your forearm without sliding down. Here is a simple protocol for cuff-loving professionals:
Your 3-Step Office Protocol for Cuff Wearers
- Before sitting at your desk, slide the cuff up toward your elbow to clear the typing zone.
- For extended work sessions, consider keeping a soft leather or fabric wrap bracelet in your drawer to swap out for comfort.
- Set a phone reminder to slide your statement cuff back down to your wrist for meetings or before leaving the office.
This method allows you to enjoy the beauty of a bold cuff without any of the functional drawbacks, proving that style and practicality can coexist.
Where to Position a Cuff on the Forearm to Elongate the Limb?
Styling a cuff over a sleeve isn’t just about preventing snags; it’s an exercise in silhouette engineering. The position of the cuff can dramatically alter the perception of your arm’s length and the overall balance of your outfit. Placing it thoughtlessly at the wrist over a bulky jumper can visually ‘cut’ the arm and look clumsy. The key is to use the cuff as a strategic tool to control volume and create a flattering line. Your choice of sleeve style is the primary factor in determining the optimal placement.
A well-placed cuff should act as an ‘anatomical anchor’, drawing the eye to a specific point and creating a sense of intention. For example, on a simple, long-sleeved knit, placing the cuff on the mid-forearm breaks up the long column of fabric and adds a sophisticated focal point. With a voluminous bishop sleeve, the cuff’s role changes to one of control, cinching the fabric at the wrist to define your silhouette. The following table, based on established styling principles, offers a clear guide to pairing cuff placement with different sleeve types for the most elongating and elegant effect. As this comparative analysis shows, each sleeve demands a different approach.
| Sleeve Type | Optimal Cuff Position | Visual Effect |
|---|---|---|
| Long fitted sleeve | Upper forearm (1/3 from elbow) | Creates focal point, elongates arm |
| 3/4 sleeve | Just above wrist bone | Bridges gap between fabric and hand |
| Bishop/balloon sleeve | At wrist to cinch fabric | Controls volume, defines silhouette |
| Pushed-up sleeve | Mid-forearm | Casual elegance, balanced proportion |
Your 5-Point Audit for Perfect Cuff and Knitwear Pairing
- Points of contact: Identify where the cuff edges could touch the knit. Are they smooth or sharp? Choose smoother cuffs for delicate fabrics.
- Fabric check: Is the knit a delicate loop (cashmere, fine merino) or a tight weave (jersey)? Adjust cuff weight and placement accordingly.
- Fit precision: Does the cuff spin or require squeezing? Ensure it has a ‘set and forget’ fit for your chosen arm position.
- Placement strategy: Is the cuff positioned to flatter your arm and sleeve type, referencing the placement guide above?
- Functionality test: Can you move your arm, bend your elbow, and go about your day without the cuff interfering or snagging?
By treating cuff placement as a deliberate design choice, you elevate it from a simple accessory to a powerful styling tool that enhances your entire look.
The Error of Wearing a Choker with a Turtle Neck Jumper
The same principles of avoiding visual clutter and respecting an item’s structure apply to other jewellery pairings, especially in winter. A common styling mistake is layering a choker over a turtleneck jumper. While it seems logical to adorn the expanse of fabric, the result is often the opposite of elegant. The high neckline of the turtleneck already serves to frame the face and elongate the neck. Adding a horizontal line directly on top of it with a choker visually shortens the neck and creates a crowded, constricted feeling.
The turtleneck provides a canvas, but it’s a canvas that calls for contrast, not repetition. Instead of adding another element close to the chin, the goal should be to draw energy downwards or outwards. This is where alternative jewellery choices become essential for a balanced and sophisticated look. Expert stylists often recommend shifting the focus away from the neck entirely.
As Debbie Azar of Gemological Science International points out, the alternatives create a more harmonious effect. In a guide from Gemological Science International, she explains:
Statement earrings and bold chunky necklaces are ideal for turtlenecks. Turtleneck sweaters provide a high neckline that creates a striking backdrop for bold, oversized earrings. For a more refined touch, consider pairing turtlenecks with elegant diamond tennis bracelets or layered delicate rings worn alongside gently rolled-up sleeves.
– Debbie Azar, Gemological Science International
If you are set on wearing a choker, there are advanced techniques, such as layering it under a semi-sheer turtleneck for a hint of intrigue, or choosing a dramatic, architectural choker worn over an ultra-thin, seamless knit for an avant-garde statement. For most everyday styling, however, leaving the neck unadorned and focusing on earrings or bracelets is the most foolproof and elegant solution.
This approach respects the bold statement a turtleneck already makes, allowing your accessories to complement rather than compete with it.
Why Does a Traditional Court Ring Cost More Than a Flat Band?
Expanding on our theme of structure and material, even a seemingly simple piece like a wedding band holds secrets in its form. When choosing a ring, many are surprised that a ‘court’ profile ring—one that is gently rounded on both the inside and outside—is consistently more expensive than a ‘flat’ profile band of the same width and metal. The price difference isn’t arbitrary; it’s a direct result of both material volume and the expert labour required to create its signature comfort.
Firstly, the curved shape of a court ring simply requires more material. Jewellery manufacturers calculate that, on average, court rings contain 15-20% more precious metal than flat bands of the same apparent width. That extra gold or platinum, while seemingly small, adds up significantly in the final cost of the raw materials. This extra volume is precisely what gives the ring its substantial, comfortable feel on the finger.
Secondly, and more significantly, is the skilled labour involved. Creating a flat band is a relatively straightforward process of cutting and finishing a strip of metal. A court ring, however, requires a master jeweller to perform multiple stages of lathing and progressive polishing. Achieving the perfectly smooth, continuously curved interior and exterior surfaces demands immense precision. Jewellery artisans report spending up to 40% more labour time to shape and polish a court ring compared to a flat one. This intensive process, often called a ‘comfort fit’, is what allows the ring to slide easily over the knuckle and sit comfortably for a lifetime of wear. You are paying for a superior ergonomic design, which requires more material and significantly more expertise to execute.
The higher price, therefore, is not just for a look, but for a tangible difference in feel and a testament to the artistry involved in its creation.
Key Takeaways
- The primary cause of cuff breakage is ‘work hardening’ from repeated bending; a cuff should be sized to slip on without adjustment.
- Strategic cuff placement over a sleeve is crucial for visual balance and depends entirely on the type of sleeve you’re wearing.
- For jewellery worn under tension, such as over knitwear, solid gold is superior to plated metal for its durability and ability to be reshaped.
How to Wear a Choker Without Shortening Your Neck Visually?
Just as a poorly placed cuff can disrupt your silhouette, a choker can have the unintended effect of visually shortening the neck if not styled with care. The choker, by its nature, is a strong horizontal line placed high on the body. For those with shorter necks or for certain body types, this can create a compressed look rather than the intended elegant or edgy one. The secret to wearing a choker successfully is to create countervailing vertical lines that draw the eye downward, effectively neutralizing the horizontal effect of the necklace.
The most powerful tool for this is the neckline of your top or dress. Pairing a choker with a deep V-neck or a scooped neckline is the classic and most effective technique. The plunging line of the fabric creates a strong downward pull that elongates the neck, giving the choker space to shine without overwhelming the area. The expanse of skin between the choker and the neckline acts as a visual ‘breather’, restoring balance and proportion.
Material and layering also play a crucial role. A dark, thick velvet choker will absorb light and create a much stronger, more shortening horizontal band than a thin, metallic chain. Skin-tone metals like rose or yellow gold reflect light and blend more seamlessly, lessening the harshness of the line. For a more advanced look, you can incorporate the choker into a layered necklace combination. By using the choker as the highest point in a cascade of longer, delicate chains, the dominant visual message becomes one of verticality, with the choker serving as the anchor point for a downward-flowing arrangement.
3 Techniques for Neck-Lengthening with Chokers
- Pair your choker with a deep V-neck or scoop neck top to create a downward vertical line that counteracts the horizontal.
- Choose thin, metallic chains in skin-tone metals (gold, rose gold) that reflect light, rather than thick, dark materials that absorb it.
- Layer the choker as the highest point in a cascade of longer necklaces to create dominant vertical lines that draw the eye down.
With these strategies, anyone can wear a choker confidently, ensuring it frames the face beautifully without sacrificing the appearance of a long, graceful neck.