The secret to saving a knotted chain isn’t a hack with powder or oil; it’s understanding the ‘physics of fragility’ that cause the tangle in the first place.
- Most breaks come from twisting (torsional stress), not pulling, especially during sleep.
- A single loose loop, the ‘knot seed’, is the origin of every complex tangle.
Recommendation: Instead of fighting the knot, focus on prevention. Always fasten your chain before storing it to create a structurally strong ‘closed loop’ that resists tangling.
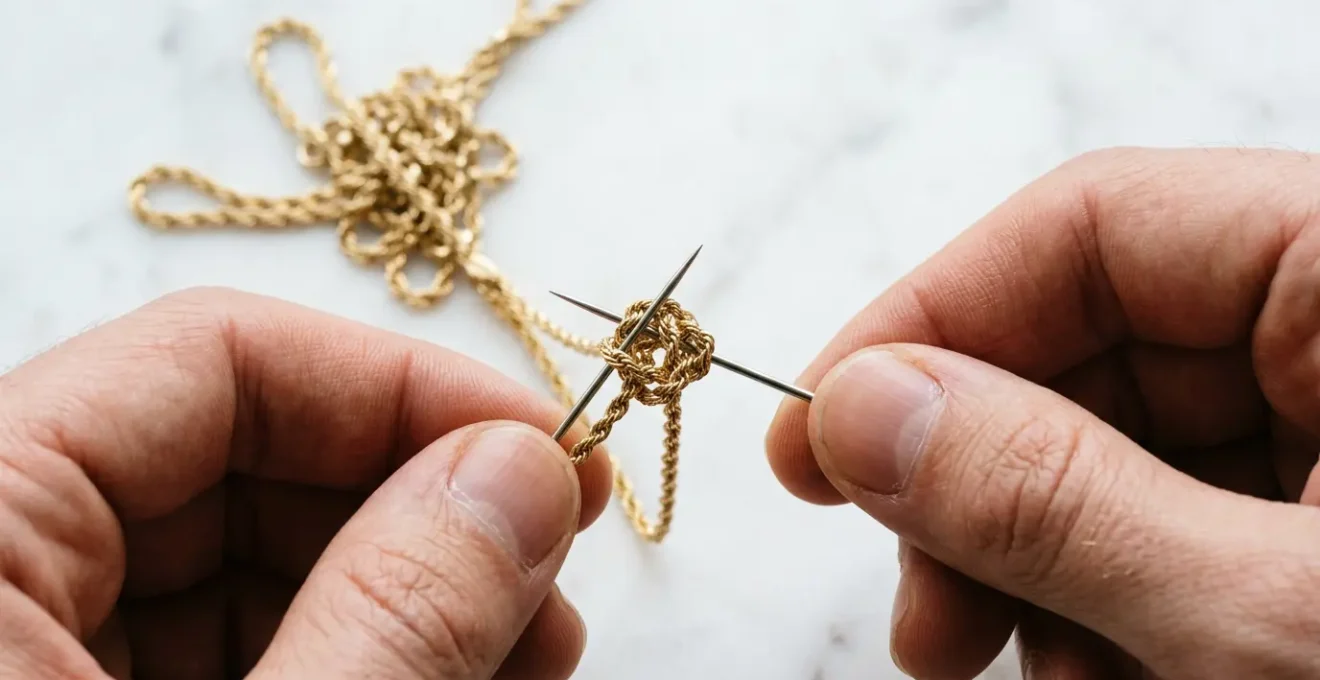
That heart-sinking moment: you reach for your favourite delicate gold chain and find it’s become an impossibly tiny, shimmering knot. The first instinct is panic, a primal urge to pull the ends apart, which is the fastest way to turn a frustrating tangle into a permanent break. As a jeweller, I’ve seen the tragic results of this panic countless times. The internet is full of quick fixes involving pins, oils, and powders. While these can sometimes work as a form of ‘first aid’, they don’t address the root cause of the problem.
The ‘barely there’ jewellery trend has made these fine, ethereal chains a staple, but their beauty comes with inherent fragility. Managing them isn’t about frantic untangling; it’s about shifting your mindset. You must learn to think like a jeweller, understanding the forces of tension, friction, and torsion that govern these delicate objects. The real solution isn’t in your kitchen cabinet; it’s in understanding the physics of your jewellery, from how it’s made to how you store it.
This guide will walk you through that understanding. We’ll start by diagnosing why your chain is so prone to snapping, then move through a complete care philosophy—from preventing tangles at night and choosing stronger designs to the crucial mistake you’re making when you toss it in your jewellery box. By the end, you won’t just know how to untangle a chain; you’ll know how to prevent it from ever becoming a problem again.
In this article, we will explore the fundamental principles of chain care, turning you from a worried owner into an informed custodian of your precious pieces. The following sections break down everything you need to know.
Summary: The Complete Guide to Fine Chain Care and Repair
- Why Does Your Lightweight Rope Chain Snap After Just One Month?
- How to Prevent Your Fine Necklace from Strangling You at Night?
- Box or Cable Chain: Which Weave is Stronger for a 1mm Width?
- The Mistake of Throwing Fine Chains into a Box Unfastened
- Is It Worth Paying £40 to Solder a Chain That Cost £80?
- Why Your Fine Chain Will Snap Under the Weight of a 5g Pendant?
- How Many Centimetres Should You Add to Your Neck Size for a Choker?
- How to Choose the Correct Pendant Chain Length for Your Neckline?
Why Does Your Lightweight Rope Chain Snap After Just One Month?
You chose the rope chain for its beautiful, intricate shimmer, but that very complexity is its weakness. Many mass-market rope chains are “hollow” to reduce the amount of gold used and lower the price. This creates a chain that looks substantial but has very little internal strength. These chains are highly susceptible to denting and breaking from torsional stress—the gentle, persistent twisting that happens with daily wear. Once a single tiny link is compromised, a catastrophic failure is inevitable.
The structural integrity of a chain is determined by its construction. Solid chains, where each link is a complete piece of metal, are far more durable. While a hollow chain might fail from a simple snag, a solid one can withstand much more force. This is why investing in quality construction is paramount for a piece you intend to wear daily. A chain’s longevity isn’t just about thickness; it’s about what’s inside.
The difference is stark. In fact, workshop experience and recent durability testing reveals that rope chains with soldered, solid links last three to five times longer than their hollow counterparts. The solder point on each link provides reinforcement, preventing the twisting and stretching that leads to breakage. When choosing a fine chain, asking if it’s solid or hollow is the single most important question you can ask.
How to Prevent Your Fine Necklace from Strangling You at Night?
While “strangling” is an exaggeration, the damage that occurs during sleep is very real. It’s tempting to never take off a beloved necklace, but wearing it to bed is one of the most common causes of breakage. As you toss and turn, the chain catches on fabric fibres, gets twisted, and is subjected to hours of sustained, low-grade stress. It’s not one big pull that breaks it, but thousands of micro-movements that create metal fatigue.
Jeweller analysis confirms this is a widespread issue. An examination of over a hundred broken chains revealed a crucial fact: a staggering 85% of them broke from torsional stress (twisting) rather than a direct pull. The primary culprit? Movement during sleep. This constant twisting weakens the links at their most vulnerable points, typically near the clasp or the pendant bail, leading to a surprise snap one morning.
The most effective preventative measure is simple: take your necklace off before you go to sleep. The second, equally important step, is to fasten the clasp before you store it. A fastened chain forms a “closed loop system.” This structure is inherently more resistant to tangling and twisting. An unfastened chain has two loose ends that can weave through loops and create the initial “knot seed” that grows into a tangled mess with the slightest movement.
As seen in this proper storage setup, each chain is fastened and hung separately. This simple habit of closing the loop before putting it away drastically reduces the opportunity for torsional stress and tangling to occur, preserving the life of your delicate pieces.
Box or Cable Chain: Which Weave is Stronger for a 1mm Width?
When it comes to fine chains, not all weaves are created equal. The design of the links directly impacts the chain’s overall strength and resistance to different types of stress. For a very fine 1mm width, the choice between a popular Box chain and a classic Cable chain is a choice between two different kinds of durability. The Box chain, with its square, interlocking links, offers excellent resistance to twisting, but the Cable chain, with its simple oval links, generally has a higher tensile strength (resistance to pulling).
Understanding these differences is key to choosing a chain that will last, especially if it’s intended for daily wear or to hold a pendant. A chain’s weakness is not just in the metal, but in the design itself. A Rope chain, for instance, is notoriously difficult to repair because its woven structure unravels, whereas a Cable chain can often be fixed by repairing a single link.
This following comparison, based on data from jewellers and gemologists, breaks down the key strengths and weaknesses of common 1mm chains. As detailed in this professional reference guide, the right choice depends on how you plan to wear the piece.
| Chain Type | Tensile Strength | Torsional Resistance | Repair Difficulty |
|---|---|---|---|
| Box Chain (1mm) | Moderate | Excellent | Easy |
| Cable Chain (1mm) | Excellent | Moderate | Very Easy |
| Rope Chain (1mm) | Good | Poor | Difficult |
The simplicity of the Cable chain is its greatest asset. As the experts at Arden Jewelers point out, this design lends it superior strength and makes it one of the easiest to fix, a crucial factor for a piece you’ll treasure for years.
Cable chains are extremely simple in design…this simplicity gives them great strength and makes them one of the easiest styles to repair.
– Arden Jewelers Technical Guide, Types of Necklace Chains Professional Reference
The Mistake of Throwing Fine Chains into a Box Unfastened
The jewellery box is meant to be a sanctuary for your precious items, but for a fine chain, it can be a torture chamber. The single biggest mistake is tossing an unfastened chain into a drawer or pouch. Any movement—opening the drawer, carrying the box, or rummaging for another piece—causes the chain to shift. This movement allows a single loose loop to form, which acts as a “knot seed.” Once this seed is planted, every subsequent movement tightens it, pulling other parts of the chain into a complex, frustrating knot.
This “knot seed phenomenon” is well-known to anyone who works with jewellery in bulk. A wholesale supplier found that chains stored in individual, fastened rolls remained pristine, while those bundled together inevitably formed these dense knots. The key takeaway is that preventing the initial seed from forming is the entire battle. Storing a chain unfastened is an open invitation for that seed to appear.
Hanging a chain is ideal, but not always practical, especially for travel. Fortunately, there are several professional techniques to keep chains separate and secure, all of which focus on immobilizing the chain and preventing that initial loop from forming. These methods ensure that your chain remains as pristine as the day you bought it, free from the stress of tangling.
Your Action Plan: Advanced Chain Storage Methods
- The Straw Method: Thread the fine chain through a standard drinking straw and fasten the clasp. This is perfect for travel as it keeps the chain straight and completely prevents tangling.
- The Foam Insert Method: Use slotted foam inserts, like those found in ring boxes. Give each chain its own individual compartment to prevent any contact or movement.
- The Card Wrap Technique: Carefully wrap the chain around a stiff piece of card (like an old credit card) and secure the ends with a small piece of tape. This creates a compact, tangle-free bundle.
- The Individual Pouch: If using soft pouches, dedicate one pouch per chain. Never store multiple chains together in the same bag.
- The Clasp Rule: Whichever method you choose, always fasten the clasp first to create a closed loop, which is structurally more resistant to knotting.
Is It Worth Paying £40 to Solder a Chain That Cost £80?
When a fine chain snaps, the question of repair versus replacement immediately arises. If a chain that cost £80 now requires a £40 repair, the logic seems simple: it’s 50% of the original cost, so why not just buy a new one? However, this calculation often overlooks crucial factors like sentimental value, the quality of the original piece, and the nature of the repair. A professional soldering job, especially with laser welding, can make a chain stronger than it was before the break.
A simple solder on a broken link is a common and relatively inexpensive repair. The cost is for the jeweller’s time and skill, not the minuscule amount of gold used. If the chain is of high quality and has sentimental value—perhaps it was a gift or a milestone purchase—then repairing it is almost always the right choice. You are preserving the story and history of the piece, which is priceless. Conversely, if the chain was inexpensive, hollow, and has no emotional attachment, putting money into a repair may not be the wisest investment.
To make a rational decision, jewellers often use a mental matrix that balances repair cost against sentimental value. This framework, reflected in professional repair cost analyses, helps separate emotion from practicality.
| Repair Cost % of Original Price | Sentimental Value | Recommendation |
|---|---|---|
| Under 30% | Any | Always Repair |
| 30-50% | High | Repair |
| 30-50% | Low | Consider Replacing |
| Over 50% | Very High | Repair if Irreplaceable |
| Over 50% | Low-Medium | Replace |
Ultimately, a high-quality repair by a skilled jeweller is an investment in the piece’s longevity. It’s a precise craft that restores not just the function, but the integrity of your jewellery.
The decision to repair is more than just financial. It’s about valuing craftsmanship and sentiment over disposability. A well-repaired chain carries its history with renewed strength.
Why Your Fine Chain Will Snap Under the Weight of a 5g Pendant?
You’ve found the perfect pendant, but pairing it with the wrong chain is a recipe for disaster. One of the most common and heartbreaking repairs we see is a beautiful, solid gold chain that has snapped because it was tasked with supporting a pendant that was simply too heavy. It’s a matter of pure physics: every chain has a maximum load capacity. Exceeding that limit, even by a gram or two, puts constant, unsustainable stress on the links.
The danger isn’t just the static weight of the pendant. As you move, the pendant swings, creating dynamic force that can be 5 to 10 times its actual weight. A 5g pendant can therefore exert up to 50g of force on a single link with a sudden movement. Furthermore, the bail (the loop that attaches the pendant to the chain) acts as a stress concentrator. Over time, it creates a “sawing” effect, gradually wearing down the link it rests on until it eventually fails.
Professional jewellers adhere to strict guidelines for pairing chains and pendants to prevent this. The “Chain-Pendant Ratio” is a critical consideration. A thicker, stronger chain is required to safely support a heavier pendant. Disregarding these ratios is not a matter of *if* the chain will break, but *when*.
The following chart, based on official jeweller’s weight ratio guidelines for 14k gold, provides a clear reference for safe pairing. Always choose a chain that can comfortably handle your pendant’s weight.
| Chain Thickness | Safe Pendant Weight | Maximum with Risk |
|---|---|---|
| 0.8mm | Up to 1.5g | 2g |
| 1.0mm | Up to 3g | 4g |
| 1.3mm | Up to 5g | 7g |
| 1.5mm | Up to 8g | 10g |
How Many Centimetres Should You Add to Your Neck Size for a Choker?
A choker’s appeal lies in its precise, elegant fit, resting perfectly against the skin. But achieving that perfect fit is more nuanced than simply buying a standard length. An ill-fitting choker is either uncomfortably tight or annoyingly loose, defeating its purpose. The key is to start with an accurate measurement of your own neck and then add a specific length based on the desired fit and the thickness of the chain itself.
There isn’t one single magic number. The amount you add depends on whether you want a high, snug “look fit” or a slightly more relaxed “comfort fit” that rests at the base of the collarbone. A thicker chain, like a snake or rope chain, will also fit more snugly than a fine cable chain of the same length because its volume takes up more space around the circumference of your neck. Therefore, you must account for chain thickness in your calculation.
To find your perfect choker length, follow this systematic process:
- Measure Your Neck: Use a soft tailor’s measuring tape. Place it exactly where you want the choker to sit. Don’t pull it too tight; it should be snug but comfortable. Note the measurement.
- Choose Your Fit: For a high, statement look, add 2cm to your neck measurement. For a classic, comfortable fit that rests on the collarbone, add 5cm.
- Account for Thickness: For every 0.5mm of chain thickness above 1mm, add an additional 0.5cm to the total length to compensate for the space the chain itself occupies.
- Perform the Swallow Test: Once you’ve determined the ideal length and have your choker, put it on. Try swallowing and turning your head from side to side. It should not feel restrictive or tight. If it does, you may need a slightly longer size or an extender.
Key Takeaways
- Most chain breaks are caused by twisting (torsional stress), not pulling. Never wear fine chains to bed.
- Always fasten a chain before storing it. A closed loop is structurally stronger and resists the “knot seed” that starts all tangles.
- The chain’s construction (solid vs. hollow) and weave (cable vs. rope) are more important for durability than its appearance.
How to Choose the Correct Pendant Chain Length for Your Neckline?
The final element of mastering fine jewellery is understanding synergy: how the chain, pendant, and your clothing work together. A beautiful pendant can be completely lost or create visual clutter if its chain length conflicts with the neckline of your top or dress. The goal is to create harmony, where the pendant has its own space to shine without competing for attention.
Fashion stylists and jewellers often refer to “The Rule of the V.” The ‘V’ is the point of your neckline. The rule states that the pendant should sit either a clear inch above the neckline or a clear inch below it. When the pendant sits directly on the fabric edge of the neckline, it creates visual tension and a cluttered look. Giving it this buffer zone allows both the garment and the jewellery to be appreciated separately.
A critical mistake is forgetting to account for the pendant’s own length. You must calculate the “visual length” of your necklace. An 18-inch chain paired with a 2-inch pendant does not function as an 18-inch necklace; it creates a 20-inch visual effect, and that is the length you must consider when pairing it with a neckline. This simple calculation is essential for achieving a polished, intentional look and ensuring your favourite piece is properly showcased.
By mastering these principles—from understanding structural integrity and preventing tangles to choosing the correct weight ratios and styling—you transform your relationship with your jewellery. You are no longer a passive wearer but an informed caretaker. To put these insights into practice, the next logical step is to audit your own collection and storage habits, applying these professional standards to preserve the pieces you love.